Obsah
ESP8266
Příklad jak naprogramovat ESP8266 v Arduino IDE od mikroma.
Web autora příkladů: https://mikrom.cz/
Kontakt na autora: mikrom@mikrom.cz
Nezapomeňte na začátku kódu nastavit své správné proměnné (SSID vlastní wifi, heslo k wifi síti, správnou adresu serveru a GUID vyplněné v administraci na tmep.cz).
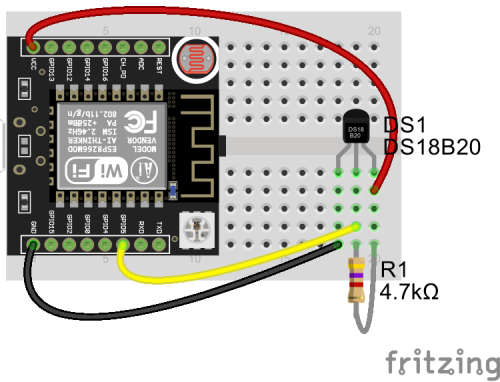
Teplota
- tmep_send_temperature.ino
/*
  Simple sketch for sending data to the TMEP.cz
  by mikrom (http://www.mikrom.cz)
  http://wiki.tmep.cz/doku.php?id=zarizeni:esp8266

  If you send only temperature url will be: http://ahoj.tmep.cz/?mojemereni=25.6 (domain is "ahoj" and guid is "mojemereni"
  If you send also humidity url will be: http://ahoj.tmep.cz/?mojemereni=25.6&humV=60
  But for humidity You will need DHT11 or DHT22 sensor and code will need some modifications, see the other sketch.

  Blinking with ESP internal LED according status:
  LED constantly blinking = connecting to WiFi
  LED on for 5 seconds = boot, setup, WiFi connect OK
  LED blink 2x per second = temp error (wrong pin, bad sensor, read -127.00°C)
  LED blink 3x per second = connect to host failed
  LED blink 4x per second = client connection timeout
  LED blink 1x per [sleep] = send data ok
*/

#include <ESP8266WiFi.h>       // WiFi library
#include <OneWire.h>           // OneWire communication library for DS18B20
#include <DallasTemperature.h> // DS18B20 library

// Define settings
const char ssid[]     = "---ssid---"; // WiFi SSID
const char pass[]     = "---password---"; // WiFi password
const char domain[]   = "---domain---";  // domain.tmep.cz
const char guid[]     = "---guid---"; // mojemereni
const byte sleep      = 1; // How often send data to the server. In minutes
const byte oneWireBus = 5; // Pin where is DS18B20 connected

// Create Temperature object "sensors"
OneWire oneWire(oneWireBus);         // Setup a oneWire instance to communicate with any OneWire devices (not just Maxim/Dallas temperature ICs)
DallasTemperature sensors(&oneWire); // Pass our oneWire reference to Dallas Temperature.

void setup() {
  pinMode(2, OUTPUT); // GPIO2, LED on ESP8266

  // Start serial
  Serial.begin(115200);
  delay(10);
  Serial.println();

  // Connect to the WiFi
  Serial.print(F("Connecting to ")); Serial.println(ssid);
  WiFi.begin(ssid, pass);
  while (WiFi.status() != WL_CONNECTED) {
    digitalWrite(2, LOW); delay(100); digitalWrite(2, HIGH); // Blinking with LED during connecting to WiFi
    delay(500);
    //digitalWrite(2, HIGH); // Blinking with LED during connecting to WiFi
    Serial.print(F("."));
  }
  Serial.println();
  Serial.println(F("WiFi connected"));
  Serial.print(F("IP address: ")); Serial.println(WiFi.localIP());
  Serial.println();

  sensors.begin(); // Initialize the DallasTemperature DS18B20 class (not strictly necessary with the client class, but good practice).

  // LED on for 5 seconds after setup is done
  digitalWrite(2, LOW);
  delay(5000);
  digitalWrite(2, HIGH);
}

void loop() {
  sensors.requestTemperatures();        // Send the command to get temperatures. request to all devices on the bus
  float t = sensors.getTempCByIndex(0); // Read temperature in "t" variable
  if (t == -127.00) {                   // If you have connected it wrong, Dallas read this temperature! :)
    Serial.println(F("Temp error!"));
    // Blink 2 time when temp error
    digitalWrite(2, LOW); delay(100); digitalWrite(2, HIGH); delay(100); digitalWrite(2, LOW); delay(100); digitalWrite(2, HIGH);
    delay(1000);
    return;
  }

  // Connect to the HOST and send data via GET method
  WiFiClient client; // Use WiFiClient class to create TCP connections

  char host[50];            // Joining two chars is little bit difficult. Make new array, 50 bytes long
  strcpy(host, domain);     // Copy /domain/ in to the /host/
  strcat(host, ".tmep.cz"); // Add ".tmep.cz" at the end of the /host/. /host/ is now "/domain/.tmep.cz"

  Serial.print(F("Connecting to ")); Serial.println(host);
  if (!client.connect(host, 80)) {
    // If you didn't get a connection to the server
    Serial.println(F("Connection failed"));
    // Blink 3 times when host connection error
    digitalWrite(2, LOW); delay(100); digitalWrite(2, HIGH); delay(100); digitalWrite(2, LOW); delay(100); digitalWrite(2, HIGH); delay(100); digitalWrite(2, LOW); delay(100); digitalWrite(2, HIGH);
    delay(1000);
    return;
  }
  Serial.println(F("Client connected"));

  // Make an url. We need: /?guid=t
  String url = "/?";
         url += guid;
         url += "=";
         url += t;
  Serial.print(F("Requesting URL: ")); Serial.println(url);

  // Make a HTTP GETrequest.
  client.print(String("GET ") + url + " HTTP/1.1\r\n" +
               "Host: " + host + "\r\n" +
               "Connection: close\r\n\r\n");

  // Blik 1 time when send OK
  digitalWrite(2, LOW); delay(100); digitalWrite(2, HIGH);

  // Workaroud for timeout
  unsigned long timeout = millis();
  while (client.available() == 0) {
    if (millis() - timeout > 5000) {
      Serial.println(F(">>> Client Timeout !"));
      client.stop();
      // Blink 4 times when client timeout
      digitalWrite(2, LOW); delay(100); digitalWrite(2, HIGH); delay(100); digitalWrite(2, LOW); delay(100); digitalWrite(2, HIGH); digitalWrite(2, LOW); delay(100); digitalWrite(2, HIGH); delay(100); digitalWrite(2, LOW); delay(100); digitalWrite(2, HIGH);
      delay(1000);
      return;
    }
  }

  Serial.println();

  // Wait for another round
  delay(sleep*60000);
}
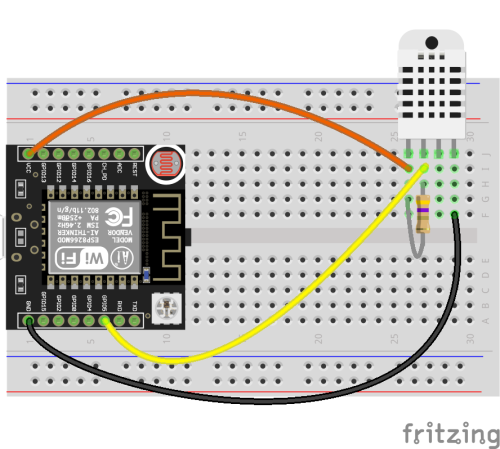
Teplota a vlhkost
- tmep_send_temperature_and_humidity.ino
// Simple sketch for sending data to the TMEP.cz
// by mikrom (http://www.mikrom.cz)
// http://wiki.tmep.cz/doku.php?id=zarizeni:esp8266
//
// If you send only temperature url will be: http://ahoj.tmep.cz/?mojemereni=25.6 (domain is "ahoj" and guid is "mojemereni"
// If you send also humidity url will be: http://ahoj.tmep.cz/?mojemereni=25.6&humV=60
// but for humidity You will need DHT11 or DHT22 sensor and code will need some modifications
//
// Not tested, but should work! :)

#include <ESP8266WiFi.h> // WiFi library
#include "DHT.h"         // DHT sensor library

// Define settings
const char* ssid    = "---wifi ssid---"; // WiFi SSID
const char* pass    = "---wifi pass---"; // WiFi password
const char* domain  = "---domain---";    // domain.tmep.cz
const char* guid    = "---guid---";      // mojemereni
const long sleep    = 600000;            // How often send data to the server. Default is 600000ms = 10 minute
const byte dhtPin   = 5;                 // Pin where is DHT connected
const byte dhtType  = 22;                // DHT type, for DHT11 = 11, for DHT22 = 22

DHT dht(dhtPin, dhtType); // Initialize DHT sensor.

void setup() {
  // Start serial
  Serial.begin(115200);
  delay(10);
  Serial.println();

  // Connect to the WiFi
  Serial.print("Connecting to "); Serial.println(ssid);
  WiFi.begin(ssid, pass);
  while (WiFi.status() != WL_CONNECTED) {
    delay(500);
    Serial.print(".");
  }
  Serial.println();
  Serial.println("WiFi connected");
  Serial.print("IP address: "); Serial.println(WiFi.localIP());
  Serial.println();

  dht.begin(); // Initialize the DHT sensor
  delay(10000);
}

void loop() {
  // Reading temperature or humidity takes about 250 milliseconds!
  // Sensor readings may also be up to 2 seconds 'old' (its a very slow sensor)
  float h = dht.readHumidity();
  // Read temperature as Celsius (the default)
  float t = dht.readTemperature();

  // Check if any reads failed and exit early (to try again).
  if (isnan(h) || isnan(t)) {
    Serial.println("Failed to read from DHT sensor!");
    return;
  }

  // Connect to the HOST and send data via GET method
  WiFiClient client; // Use WiFiClient class to create TCP connections

  char host[50];            // Joining two chars is little bit difficult. Make new array, 50 bytes long
  strcpy(host, domain);     // Copy /domain/ in to the /host/
  strcat(host, ".tmep.cz"); // Add ".tmep.cz" at the end of the /host/. /host/ is now "/domain/.tmep.cz"
  const int httpPort = 80;

  Serial.print("Connecting to "); Serial.println(host);
  if (!client.connect(host, httpPort)) {
    // If you didn't get a connection to the server
    Serial.println("Connection failed");
    return;
  }
  Serial.println("Client connected");

  // Make an url. We need: /?guid=t&humV=h
  String url = "/?";
         url += guid;
         url += "=";
         url += t;
         url += "&humV=";
         url += h;
  Serial.print("Requesting URL: "); Serial.println(url);

  // Make a HTTP GETrequest.
  client.print(String("GET ") + url + " HTTP/1.1\r\n" +
               "Host: " + host + "\r\n" +
               "Connection: close\r\n\r\n");

  // Workaroud for timeout
  unsigned long timeout = millis();
  while (client.available() == 0) {
    if (millis() - timeout > 5000) {
      Serial.println(">>> Client Timeout !");
      client.stop();
      return;
    }
  }

  Serial.println();

  // Wait for another round
  delay(sleep);
}

