ruzne:esp8266
ESP8266 a zobrazení poslední teploty z tmep.cz
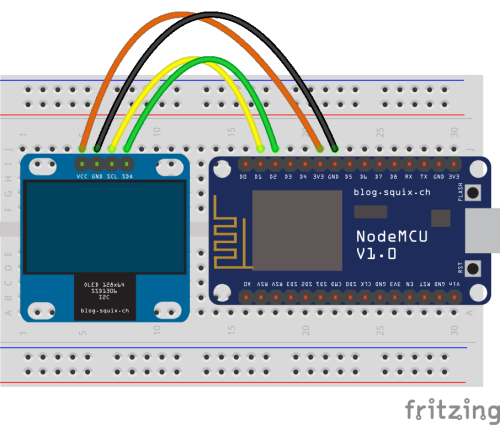
Příklad jak naprogramovat ESP8266 v Arduino IDE od mikroma.
Web autora příkladu: http://mikrom.cz/
Kontakt na autora: mikrom@mikrom.cz
Nezapomeňte na začátku kódu nastavit své správné proměnné (SSID vlastní wifi, heslo k wifi síti a správnou adresu k JSONu na tmep.cz).
- tmep_read_json_to_oled.ino
// Simple sketch for reading data from the TMEP.cz (and write them on Serial and OLED display)
// by mikrom (http://www.mikrom.cz)
// http://wiki.tmep.cz/doku.php?id=zarizeni:esp8266

#include <ESP8266WiFi.h>       // WiFi library
#include <ArduinoJson.h>       // JSON library
#include <Wire.h>              // I2C communication library for OLED
#include <Adafruit_GFX.h>      // Core graphics library for OLED
#include <Adafruit_SSD1306.h>  // Hardware-specific library for OLED
#define OLED_RESET BUILTIN_LED

// Define settings
const char* ssid    = "---wifi ssid---"; // WiFi SSID
const char* pass    = "---wifi pass---"; // WiFi password
const char* jsonurl = "---json url---";  // JSON's URL (ex. https://tmep.cz/vystup-json.php?id=xxx&export_key=xxxxxxxxxx
const long sleep    = 600000;             // How often read data from the server. Default is 600000ms = 10 minute

Adafruit_SSD1306 display(OLED_RESET); // Create OLED display class

void setup() {
  // Start serial
  Serial.begin(115200);
  delay(10);
  Serial.println();

  // OLED display
  display.begin(SSD1306_SWITCHCAPVCC, 0x3C); // Maybe change 0x3C to your address
  display.clearDisplay();                    // Clear buffer
  display.setTextColor(WHITE);
  display.setTextSize(1);
  display.setCursor(0,0);
  display.println("TMEP.cz display");
  display.println();

  // Connect to the WiFi
  Serial.print("Connecting to "); Serial.println(ssid);
  display.print("Connecting to "); display.println(ssid);
  WiFi.begin(ssid, pass);
  while (WiFi.status() != WL_CONNECTED) {
    delay(500);
    Serial.print(".");
    display.print(".");
    display.display(); // We need update display after every dot
  }
  Serial.println();
  display.println();
  Serial.println("WiFi connected");
  display.println("WiFi connected");
  Serial.print("IP address: "); Serial.println(WiFi.localIP());
  display.println("IP address:"); display.println(WiFi.localIP());
  Serial.println();

  display.display(); // Update display
  delay(10000);
}

void loop() {
  // OLED display
  display.clearDisplay();
  display.setTextColor(WHITE);
  display.drawRoundRect(1, 20, display.width()-2, display.height()-26, 3, WHITE); // Draw outline

  // Connect to the HOST and read data via GET method
  WiFiClient client; // Use WiFiClient class to create TCP connections

  const char* host = "tmep.cz";
  const int httpPort = 80;

  Serial.print("Connecting to "); Serial.println(host);
  if (!client.connect(host, httpPort)) {
    // If you didn't get a connection to the server
    Serial.println("Connection failed");
    return;
  }
  Serial.println("Client connected");

  // Make an url
  char url[50];                                   // Make new array, 50 bytes long
  strncpy(url, &jsonurl[15], strlen(jsonurl)-14); // Remove "https://tmep.cz" and leave rest

  Serial.print("Requesting URL: "); Serial.println(url);

  // Make HTTP GET request
  client.print(String("GET ") + url + " HTTP/1.1\r\n" +
               "Host: " + host + "\r\n" +
               "Connection: close\r\n\r\n");

  // Workaroud for timeout
  unsigned long timeout = millis();
  while (client.available() == 0) {
    if (millis() - timeout > 5000) {
      Serial.println(">>> Client Timeout !");
      client.stop();
      return;
    }
  }

  // Read JSON
  String data;
  bool capture = false;
  String json;
  while (client.available()) {
    data = client.readStringUntil('\n'); // Loop over rows. "\r" not work. "\0" returns all at one
    //Serial.println(data);
    // First few rows is header, it ends with empty line.
    // This is unique ultrasimple, but working solution.
    // Start capture when { occurs and end capturing with }.
    if(data.startsWith("{", 0)) { // JSON starts with {. Start capturing.
      capture = true;
    }
    if(data.startsWith("}", 0)) { // JSON ends with }. Stop capturing.
      capture = false;
    }
    if(capture){
      json = json + data; // Joining row by row together in one nice JSON part.
    }
  }
  json = json + "}"; // WTF, last bracket is missing :/ add it here - ugly!
  Serial.println(json);

  // Lets throw our json on ArduinoJson library and get results!
  StaticJsonBuffer<300> jsonBuffer; // možná dynamicBuffer
  JsonObject& root = jsonBuffer.parseObject(json);
  if (!root.success())
  {
    Serial.print("ParseObject() failed");
    return;
  }

  // This is how our JSON looks. You can read any value of parameters
  // {
  //  "teplota": 24.87,
  //  "vlhkost": null,
  //  "cas": "2016-06-02 18:29:45",
  //  "umisteni": "Trutnov"
  // }
  String cas = root["cas"]; // Get value of "cas"
  Serial.print("cas: "); Serial.println(cas);
  display.setTextSize(1);
  display.setCursor(30,0);
  display.print("Last update");
  display.setCursor(6,10);
  display.print(cas);

  float teplota = root["teplota"]; // Get value of "teplota"
  display.setTextSize(4);
  display.setCursor(6,25);
  if (teplota == -127.00) { // If you have connected it wrong, Dallas read this temperature! :)
    Serial.println("teplota: chyba!");
    display.print("ERR");
  } else {
    Serial.print("teplota: "); Serial.println(teplota);
    display.print(teplota, 1); // Round temp to one decimal point
    display.setTextSize(3);
    display.setCursor(105, 25);
    display.print(char(247)); // (Ugly) Degree symbol ° (but smaller not so bad)
  }

  //String vlhkost = root["vlhkost"]; // Get value of "vlhkost"
  //String umisteni = root["umisteni"]; // Get value of "umisteni"

  display.display(); // Update display
  Serial.println();

  // Wait for another round
  delay(sleep);
}
